January is coming to a close, so let's dive into the HubSpot Product Updates for this month. Elixir is here to highlight the top 6 updates that will take your HubSpot experience to the next level.
Working with HubSpot, but you want to take it to the next level? Let's connect with a free discovery call.
Elixir as you go-to HubSpot Partner!
TABLE OVERVIEW
3. Conditional Form To URL Routing
4. Save & Reuse Groups of Workflow Actions With Action Sets
6. Associated Deal Value: A New Metric Rolling Out For Marketers
1. SPF/DMARC for All
What is it? SPF & DMARC for All' will add SPF and DMARC records to the 'Connect an Email Sending Domain' flow, and expose connection status directly in HubSpot.
Customers will now be able to:
- Copy DMARC and SPF records directly from HubSpot to their DNS
- Check the connection status for DMARC, DKIM, and SPF directly in HubSpot
Why is it Important? Starting February 2024, Google and Yahoo will be requiring DMARC, DKIM and SPF for all bulk senders. Moving forward, any bulk sender who does not have all three authentication measures in place will be blocked or directed to spam. By adding SPF and DMARC to the connection flow, customers will now be able to manage their email authentication directly in HubSpot.
How Does it Work?
To add a new domain:
- Navigate to 'Settings' -> 'Websites' -> 'Domains & URLs'
- Press 'Connect a domain' -> 'Email Sending' -> 'Connect'
To check domain connection status:
- Navigate to 'Settings' -> 'Websites' -> 'Domains & URLs'
- Scroll down to 'Email sending domains' section
- Review connection status and press 'Continue domain setup' to add missing records
For more information about how this works in the product please see our Manage Email Authentication in Hubspot Knowledge Base Article.
Who gets it? Marketing Enterprise, Marketing Pro, Marketing Starter
2. Linkedin Documents Support
What is it? Now, you have the ability to publish and analyze LinkedIn documents such as PDFs. This exciting feature allows you to easily share documents on your LinkedIn profile. Expand your reach and engagement on the platform by utilizing this new functionality.
Why is it Important? As marketers strive to expand their organic social strategy, creating and distributing a variety of content becomes a clever way to reach wider audiences and boost engagement. By publishing documents on LinkedIn, businesses can effectively share relevant information in a format that is easily digestible for their target audience. Whether it's reports, case studies, or sales information, documents serve as an excellent medium for marketers to share in-depth and informative long-form content.
How Does it Work?
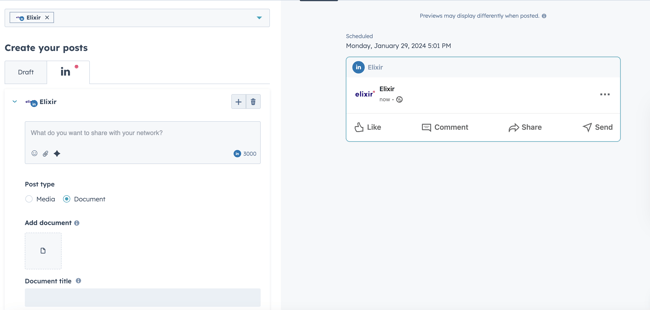
To create a Linkedin document post:
- In your HubSpot account, navigate to Marketing > Social.
- In the upper right, click Create social post
- In the left panel, click the Select accounts dropdown menu. Then, select the checkboxes next to the Linkedin accounts you want to post to.
- Input your post description and content.
- Under Post Type, select documents and then upload your file.
- You can also report on the performance of your document post.
Important LinkedIn PDF Considerations:
- Must be under 100MB in size
- Should not exceed 300 pages
Who gets it? Marketing Enterprise, Marketing Pro
>>> elixir's take: We are extremely excited about this update, but imagine how much more powerful it would be if we could incorporate carousel features as well.
3. Conditional Form to URL Routing
What is it? Once a form is submitted, you have the power to send visitors on a journey to a meeting scheduling page, a HubSpot page, or even an external URL. No longer limited to a one-size-fits-all approach, you can now create conditional rules to guide visitors to specific destinations based on the valuable form data you collect. Whether it's their region, company size, or revenue, you can tailor their experience to ensure they arrive at the perfect destination for their needs.
Why is it Important? Like routing prospects to the right scheduling page based on any form field values or automated rules to decide who gets to book time immediately on a calendar, you can now do the same for HubSpot pages and external URLs, giving you the tools you need to personalise your prospects experience.
How Does it Work?
Users can leverage the valuable data collected through form submissions to tailor their prospect's journey, guaranteeing they are guided to the perfect destination for their specific needs.

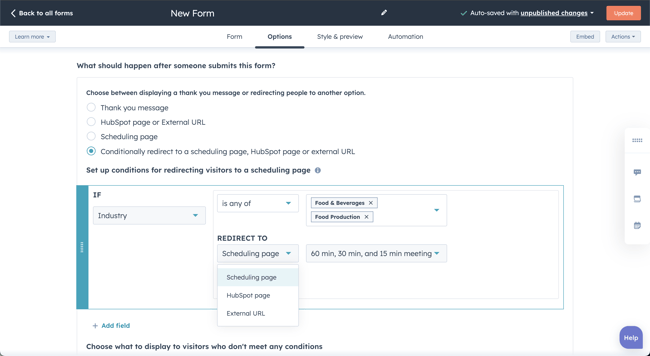
When you're editing a form, head over to the 'Options' tab. Under the 'What should happen after someone submits this form?' section, you'll find a range of options to choose from.
You can select 'Thank you message', 'HubSpot Page or External URL', or 'Scheduling page' to redirect all visitors to the same destination.
If you want to set up specific conditions for redirecting visitors, simply choose 'Conditionally redirect to a scheduling page, HubSpot page or external URL'.

Set the specific conditions, and then select where visitors should be redirected upon form submission if conditional are met!
Who gets it? Sales Enterprise, Service Hub Enterprise.
>>> elixir's take: Create an inventory of the pages where you have placed a form and analyze the content on those pages. Take a deep dive into the buyer's journey and identify opportunities to enhance their experience. This will allow you to identify any gaps in your content and ensure that you are guiding your prospects every step of the way towards conversion.
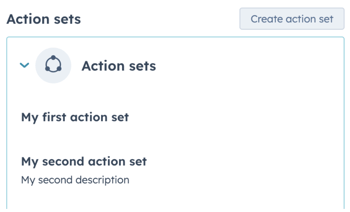
4. Save and reuse groups of workflow actions with Action Sets
What is it? Now you have the power to save a collection of workflow actions into an Action Set, so you and your team can easily reuse them.
Action Sets are available for all Enterprise portals with workflows access.
Why is it Important? Action Sets not only speed up the process of creating workflows but also give your workflow admins the ability to create guides for the rest of their teams to leverage while they're making workflows!
Workflow creation can be time-consuming and repetitive as customers often reuse the same groups of actions. Currently, they have to rebuild the workflow, clone it entirely, or copy and paste actions, leading to errors and inconsistencies.
How Does it Work?
To create an action set:
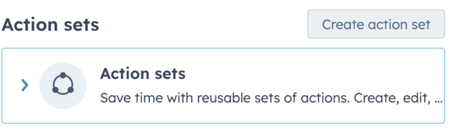
- Open a workflow, and click to add an action to the workflow. Scroll down to "Action Sets" section and click "Create Action Set"
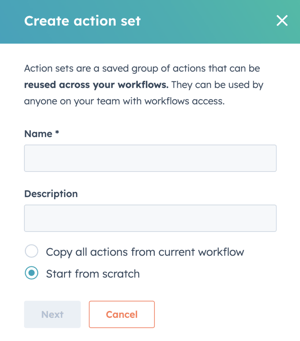
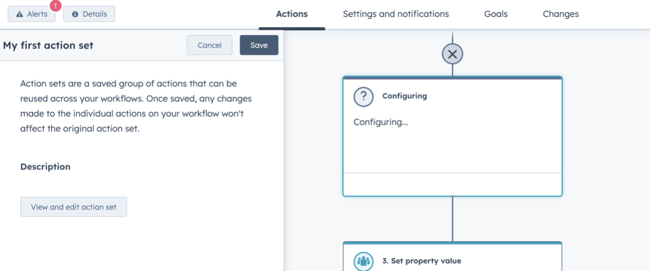
2. Name it and add a description and choose if you want to create it from scratch, or the existing actions in the workflow.
3. Then edit or add actions to your action set like you would a workflow. When you're done, hit "save". You'll see the action set in your side panel, and you can either hit "Cancel" to go back to your list of actions and see the action set there or you can hit "Save" and it will insert the newly created action set into your workflow.
Add an action set in a workflow:
Go to the workflow you are creating or editing. If you want to add an action set, click the "+" sign where you want to add it, and then in the action panel scroll down to your action sets. Select the one you want to add and hit save. You can also choose to view and edit the action set from this panel. Click save and the actions will appear in the workflow!
Important Considerations:
- The action sets that show up as available to use in your workflow are only those that were created in that workflow type. For example, only Action sets created in a contact workflow will be available to use in a contact workflow.
- Similar to cloning actions, you can only insert action sets at the end of a workflow. However, if the action set does not contain any branches, you can also insert it in the middle of a workflow.
- Action sets can be added anywhere in your workflow.
Who is it for? Marketing Enterprise, Operations Enterprise, Sales Enterprise, Service Enterprise
Learn more on the Knowledge Base
5. One Click Unsubscribe
What is it? Making email headers compliant with one-click unsubscribe requirements with ease.
Why is it Important? As mentioned in update 1, Google and Yahoo are making some updates, which include enforcing one-click unsubscribe starting in February 2024. In order to ensure compliance with these changes, we need to make updates to our current email header format.
> Please note that there may be a temporary increase in unsubscribe rates once this update is released.
How Does it Work?
All of the updates will be automatically applied to your email headers, and no customer action is required to be compliant. On the recipient side, this will automatically appear as an unsubscribe link or button displayed next to the email sender information.
Who is it for: This update will apply to all marketing emails sent out of HubSpot. We will slowly roll out this update over the next two weeks, and all customers will have the updated headers before February 1.
6. Associated deal value: A new metric rolling out for Marketers
What is it? Today, we're giving Marketing Pro customers additional insights into the impact of their campaigns on revenue.
Introducing 'Associated deal value' a new metric that sums the total deal value of all the closed-won deals associated with a campaign.
Why is it Important?
Starting in October 2023, HubSpot rolled out a brand new ‘Revenue’ data section in the campaign ‘Performance’ tab for Marketing Pro customers. This rollout included the following metrics:
1. Revenue
2. Deals with revenue
3. Contacts with revenue
We are rolling out our latest metric, associated deal value, to provide further context around the total amount of revenue that is associated with your campaigns.
Altogether, that means that you can now read the card as follows:
- Associated deal value | The total value of all the deals that are associated with contacts who engaged with the campaign or asset.
- Revenue | How much revenue the campaign or asset contributed to the total deal. HubSpot evenly splits credit (or revenue) across all of the touchpoints associated with a closed-won deal.
- Deals | How many closed-won deals are associated with the contacts who engaged with the campaign or asset.
- Contacts with revenue | How many contacts who engaged with the campaign or asset that went on to drive revenue.
How Does it Work?
When you enter a portal that has Marketing Pro, click into any Performance tab that supports the Revenue card. There, you will see the total deal amount metric calculated for you.
The following Marketing Hub apps support a revenue attribution card where you can now see this metric:
-
-
-
- Blog post
- Campaigns
- Marketing email
- Landing page
- Website page
-
-
Who is it for: Marketing Pro
Conclusion:
Overall, these updates enhance the functionality and effectiveness of HubSpot, empowering users to achieve their business goals with more ease.
Want to explore the possibilities with HubSpot and/or get guidance, let's connect!
Don't forget to share this post!
